Google Slides has recently come out with some exciting updates. You may have already read about my excitement about the Pear Deck Add-on! I wanted to share a couple other great updates in this post:
1. Add-ons for Google Slides
Add-ons are now available in Google Slides. Students might be interested in installing Unsplash, which provides high-resolution photos for free (free to use for commercial & personal uses). This is a great one to share with students as you talk about fair use images. Plus, with this Add-on, students can search for and add images without leaving their Google Slides presentation.

For teachers, if you haven’t already installed the Pear Deck Add-on, I recommend getting to that asap.
More on how to install & use Add-ons
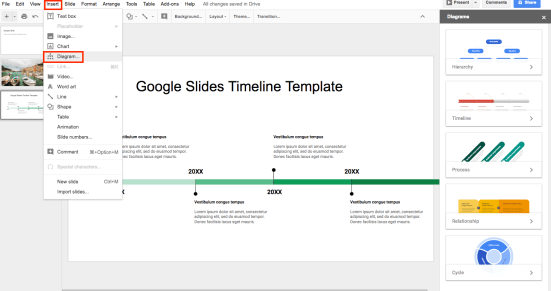
2. Diagrams and Timelines
Google Slides has added the ability to insert a pre-formatted diagram to your presentation. Among the diagram types to choose from, you will find the option to insert a timeline, which may come in handy for projects!
3. Linked Slides
You can link and sync slides from multiple presentations with a click. This is useful if you are using a set of slides in multiple presentations. Instead of having to make a change to the copied slide in each of the presentations, you can “link” your slides to a single source.

More on how to use Linked Slides
4. Grid view of presentations
There is now a grid view option in Google slides.

5. Google Keep Integration
You can now drag-and-drop between Google Keep and Google Slides. When you add a note from Keep into your presentation, Slides will automatically add a title and description for you.
6. Skip a slide when presenting without deleting it
You now have the option to skip slides when presenting. So instead of needing to create multiple versions of a presentation, you can choose to skip over slides when presenting.
To skip a slide: On the left sidebar, right click the slide you want to skip and choose Skip slide. You’ll see a checkmark next to Skip slide. To re-enable that slide, simply right click on that slide again & click again to remove the checkmark.

Installing & Using the Unsplash Photos Add-On
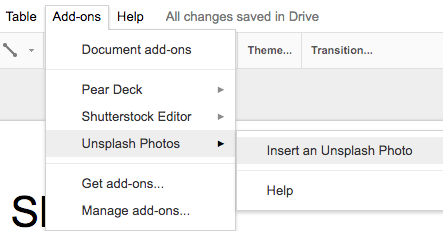
- To get a new Add-on, in the menu bar, click Add-ons and choose Get add-ons…
- Find the Unsplash Photos Add-on and click the blue + Free button to add
- Click Allow
- Click the Add-ons menu > Unsplash Photos > Insert an Unsplash Photo
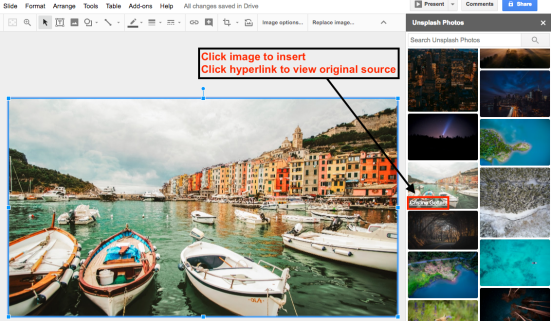
- A right sidebar will open. Search for your image.
- To insert: simply click the image and it will insert on your slide. You can resize and crop, as needed.
- To cite: hover over the image and click the hyperlink that pops up to view the original source.
Using Linked Slides
- Copy a slide or set of slides in Presentation A to Presentation B
- When you paste your slide(s) in Presentation B, you’ll see an option to Link slides. Click this option to link.

- When you make changes, click the link icon at the top right of your slide and click Update.


Pingback: Brillante Viernes: October 6, 2017 – Maris Hawkins